Hay Production

ON THIS PAGE
- Tips for Hay Making
- Fertilizing Mountain Hay Meadows
- Irrigation Water Management
- Hay Testing
- For other Agriculture Topics, go to Agriculture, Livestock, Range & Pasture Management, and Soil Health & Climate Change
If you purchased land that includes a hay field, you may be interested in ways to improve your hay making process and minimize your losses.
Tips for Hay Making
Cut hay earlier in the season for better hay quality. Hay QUALITY and QUANTITY are inversely proportionate. In other words, as hay quantity goes up, hay quality goes down. Immature plants have greater leaf to stem ratios. Because the leaf is the ‘meat’ of the plant, more leaf equals higher nutrition (higher crude protein and sugar content), higher palatability, and higher digestibility.
If putting up a mix of immature and mature hay, stack it in separate stacks according to high or low quality. When the time comes to start feeding hay, feed the highly nutritious, immature hay to your young, old, and/or late gestation and lactating animals. These animals have higher nutritional needs and require better feed quality. Feed the less nutritious, mature hay to your early gestation and maintenance stock.
Only bale hay with a moisture content of less than 20% for small bales and less than 18% for large bales. If baled at moisture content of 20% or more, hay may start to caramelize and mold. Heat will be produced and may cause spontaneous combustion to occur (and a fire to start). On the other hand, hay with less than 12% moisture is too dry and will likely shatter during tedding (spreading hay out to dry), raking (putting hay together into rows), or baling. In that case, you will just be baling stems. If you have not already invested in a good hay moisture tester, it is a MUST HAVE for all hay producers.
Cut hay later in the day to maximize sugar content. Plants photosynthesize during the day to produce sugars and oxygen. At night, they respire and use some of those sugars produced during the day to grow and set seed. Thus, plants are at their lowest energy level early in the morning. The only catch to this tip is that hay cut later in the day will NOT have time to dry on the initial day of cutting. Be sure to check the weather forecast beforehand and verify no threat of rain showers overnight or in the near future.
Decrease your drying time by setting your mower width to the widest possible setting. When mowed at the widest possible mower setting, grass will lay more evenly on the stubble and air will move more freely through and around the grass. Mowers with conditioners will also improve your drying time because they crack the stems to release trapped moisture.
Minimize dry matter and leaf loss by working your hay as little as possible. Determining the right time to mow, ted, rake, and bale can be difficult. If you must ted your hay (spread it out to dry), do so the morning after mowing and once the dew is off but while the hay is still tough. Also, rake the hay (put it back together in rows) when it is slightly tough. This will minimize leaf loss from both tedding and raking. Even if your grass is tough when you put it in a row, remember to check the final moisture content before baling it to ensure it is below 18-20% moisture content.
Colorado Custom Rates charged for various crop and livestock operations and lease arrangements. https://abm.extension.colostate.edu/custom-rates-survey/
Fertilizing Mountain Hay Meadows

Whether it provides hay for the winter or forage in the fall, livestock in the high country rely on hay meadows for feed. Deciding whether to fertilize your mountain hay meadows comes down to a balancing act between the cost of input and the production potential. Virtually all meadows are nitrogen deficient and will respond to nitrogen fertilizer. A safe estimate is that you will get approximately 20 pounds of increased forage for every pound of applied nitrogen. Nitrogen uptake, however, may be limited by a phosphorus deficiency. Performing soil tests for Phosphorus, Potassium, and Sulfur may be beneficial in determining the proper fertilizer mix needed for your specific fields.
The survey is still out for determining the best application timing. Some producers say fall fertilization will produce consistently higher yields than spring fertilization, and fall is better than spring if you are adding phosphorus to the mix. Phosphorus tends to give legumes (clovers and alfalfa) an extra boost, but it takes longer to absorb into the soil. Nevertheless, fertilizer prices and availability, field condition, and your workload must also be considered when deciding the right time to fertilize.
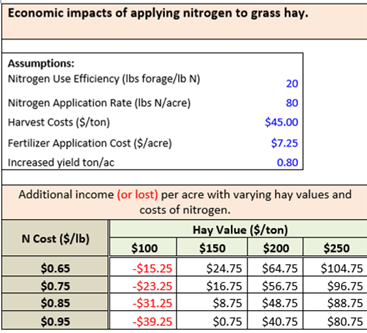
When hay prices are low or favorable moisture conditions are questionable, cost-effectiveness should also be considered. Fertilizer can be expensive, and plants still need adequate water to grow (regardless of their nitrogen availability), so ask yourself if fertilizing will really pay off in the end. The chart below may help you in determining the cost-effectiveness of fertilizing mountain hay meadows.
Fertilizer Cost Calculator | Department of Agricultural and Resource Economics
Quantity vs Quality
Hay producers must consider the tradeoff between quantity and quality of the harvested forage. Do you need to produce a certain amount of hay to have enough feed for the winter, or do you need to sell a specific number of bales to make a profit? These questions pertain to the quantity of hay, but the quality of hay is also important when contemplating your animals’ and customers’ needs. There is an inverse relationship between quantity and quality. As the forage yield (quantity) increases, the quality of that forage decreases (protein content and digestibility). Your goal should be to produce the most amount of hay per acre possible that will still meet the quality/nutritional objectives of the animals being fed. In other words, BOTH QUANTITY AND QUALITY should be considered when setting production goals.
Irrigation Water Management (IWM)
The primary form of irrigation in Middle Park is ‘Wild Flood Irrigation.’ High efficiency irrigation solutions (like sprinkler systems) are not always feasible in the mountains. Furthermore, despite being considered ‘inefficient and wasteful’, wild flood irrigation has value. During the peak runoff in the spring and early summer, agricultural withdrawals reduce the risk of flooding. Then, in the fall when natural stream flows are low, agricultural returns provide a boost of water that helps maintain fisheries and water quality. These benefits are a result of increased groundwater storage and lower consumptive use of flood irrigation compared to sprinkler irrigation. Additionally, wild flood irrigation systems produce temporary marshes utilized by wetland birds in the summer and during migrations. Finally, wild flood irrigation has lower energy costs compared to higher efficiency irrigation systems. Despite these positive qualities, wild flood irrigation should be properly managed.
Why Practice Proper IWM
With proper irrigation management, you will likely see the benefits of…
- Increased forage production
- Better hay quality
- Improved soil health
- Preferred species assemblages throughout your field
How to Practice Proper IWM
Install check and turnouts throughout your field.
Check and turnout structures in a ditch act as temporary dams to force water out of the ditch and into a given area of the field. They also force water down specific ditches as determined by the irrigator. In the old days, ranchers used large clumps of grass and mud as the dams. These were very inefficient because so much water seeped through and around the clods. As technology improved, orange dam material was (and is still) used. Dam material is better at reducing leakage but still requires a lot of labor. The newest and most efficient option is to install culvert pipes with gates. Though there is a significant upfront cost to installing pipes, the payoff is drastic. There will be practically no leakage and almost no labor at all.
Practice intermittent irrigation
The ‘ideal soil’ is comprised of 50% mineral content, 25% air, and 25% water. The air and water benefit the growth of vegetative roots. Different vegetative species have different tolerances for the amount of water they can withstand. Some species get choked out quickly when flooded by water. Thus, they need periods without irrigation to dry out a bit and breathe once again. Other species can tolerate being supersaturated with water for much longer. The species that need breaks from water to breathe are the ones you want in your meadow, like timothy, meadow brome, and clover. They are nutritiously dense and more palatable to livestock. The less desirable species tend to be the water-tolerant, less nutritious and less digestible rushes, sedges, meadow foxtail, and slough grass. This is why it is critical to move your water around and use check and turnout structures to manage your water at any given time. Proper irrigation management does NOT include turning your water on at the beginning of summer and not touching it again until the day you turn it off to hay. If it is super rainy, turn your irrigation water down or off. There is no need to overwater your fields by adding water on top of water.

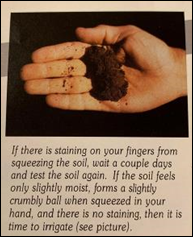
To know if your soil has the proper amount of moisture, check it by taking a sample from approximately 6” in depth (the height of your shovel spade). Squeeze a handful of soil. If it forms a slightly crumbly, slightly moist ball that does not leave a stain or water on your hand, it is time to irrigate. If it is drenching wet, do NOT irrigate. On the other hand, DON’T wait until it is powdery fine to irrigate either because it will take much longer to fill the water table again. See the photo to the right for a visual representation of ‘proper moisture content.’
Ag Burning: If you intend to burn your ditches in preparation for haying season, please read the Ag Burning section.
Hay Testing
All animals have basic nutritional requirements that vary based on their age, work demand, and physiological state (maintenance, growing, pregnant, lactating, or geriatric). By testing your hay, you will have the knowledge to actively manage your animals’ nutritional needs like never before.
The most basic Forage Analysis will test for Moisture, Crude Protein (CP), Acid Detergent Fiber (ADF), and Neutral Detergent Fiber (NDF). Total Digestible Nutrients (TDN) and Net Energy (NE) are calculated values based on Protein and Fiber results. ALWAYS LOOK AT THE DRY MATTER BASIS COLUMN!!! Crude Protein (CP) is a measure of Nitrogen and is commonly used as a standard for gauging protein requirements for animals.
Higher Crude Protein values are better.
ADF is a measure of feed digestibility, while NDF is a measure of feed intake and satiation. Lower values are better for both ADF & NDF!
The value for TDN is the sum of all the digestible nutrients in a feedstuff and is used as a common measurement for Energy. TDN is especially useful for roughage-based diets. Net Energy (NE) also estimates energy but is more applicable to concentrate-based diets (grains and pellets). Values for TDN and NE are calculated from ADF. With either TDN or NE, higher values are better!
In general, forages that contain less than 70% NDF and more than 8% crude protein (on a Dry Matter basis) will contain enough digestible protein and energy to maintain mature, ‘maintenance’ animals during the summer. growing, gestating, lactating, AND GERIATRIC (REALLY OLD) animals have higher nutrient requirements. See the Winter Feeding section for more info on winter feed requirements.
Ag producers looking to improve the quality of their haylands may consider taking advantage of the Middle Park Habitat Partnership Program (HPP) annual clover seed program facilitated by Middle Park Conservation District. Clover and alfalfa seed is offered on a limited basis in the spring while supplies last. Contact MPCD | 970-724-3456, ext 4.
HPP also has an herbicide giveaway each year for ag producers with 600+ acres. Contact Grand County DNR | 970-887-0745
References: 10, 43, 44, 45, 46, 47


